Monday, October 29, 2012

The Great Food Blogger Cookie Swap - Year Two!

 It's baaaaaack!


The Great Food Blogger Cookie Swap

I participated in this last year and it was so much fun! And honestly, who doesn't like getting surprises in the mail - especially when they are fabulous cookies! What happens with this cookie swap is that you get the addresses of three other bloggers and send them each one dozen of the cookie you've decided to make. In return, you will also get three shipments (all one dozen each) from three other bloggers so you can test out their cookies. Once all the cookies have been received, you then blog about your recipe so that all can see how you made them (and even try making these themselves). How fun, right? I think it is! I definitely don't need three dozen cookies around tempting me during the holiday season, so I sure hope that Ryan, my family and colleagues at work can help me eat them. 

Now comes the question - What type of cookie should I send out? It can not be a cookie I've made and blogged about before. I am thinking a fun and new cookie. A cookie no one would expect. I have a few ideas up my sleeve, but does anyone have any recommendations? Here are the recommendations I have from my family & friends so far: coconut thumbprint cookies filled with carrot cake jam, fig cookies and these really fun sugar sparkle cookies. I am kinda leaning towards a bar cookie though. I don't know why, but it seems to be calling my name. So many cookies. So many choices!


Shipments go out on Friday, December 5th with the recipe posted to my blog by Wednesday, December 12th!


Saturday, October 27, 2012

Cornmeal Pancakes

The first time I ever had cornmeal pancakes (aka johnnycakes) was with the captain. If my memory serves me right, the first time he made these for me is when he was still living down in San Luis Obispo and I went to visit him. Ya, I am pretty sure that is when he made them for me. Needless to day, I have been addicted to them ever since and I still only eat them with him. I don't know why I don't eat them without him. Maybe it's just the memories. Awww.

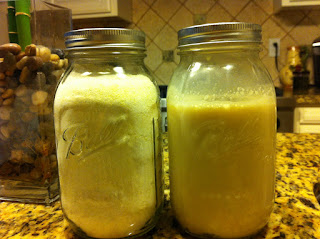
Okay, enough mushiness. Sorry about that.  This cornmeal pancake recipe is so easy, you can throw it all together in just a couple of minutes. Just be warned - it makes a TON of pancakes. Like towers of pancakes. Definitely more pancakes than two people need, but would easily serve a family of four no problem. Maybe even five. Although you can whip these babies up in no time, you can even prep everything the night before or a couple days ahead of time so all you have to do is dump, mix and cook. At least that is what I did. I mixed all the dry ingredients together and then placed them in a mason jar for easy transporting. Then, I also did the same with the wet ingredients. The best part about putting the wet ingredients in the jar is you just pop the lid on and give it a shimmy shake to combine everything. No need to dirty another bowl or a whisk.

If you've never had cornmeal pancakes, you've got to try them. They are smaller than your traditional pancakes and have a corny, slightly gritty texture to them. I can't really explain them. You just have to try them. Seriously. Try them tomorrow. Try them today. Just promise me you'll try them!


ingredients

mason jars filled and ready to go

the captain is mixing

pancakes almost ready to eat

cornmeal pancakes with huckleberry sauce from our trip to Yellowstone!

the captain always makes me a mickey mouse pancake. awwww.

leaning tower of pancakes

Cornmeal Pancakes (www.pioneerwoman.com)

1-1/2 cup Flour
1-1/2 cup Yellow Cornmeal
1/2 teaspoon Salt
3 Tablespoons Baking Powder
4 Tablespoons Sugar
2-1/4 cups Milk (more If Needed)
2 whole Large Eggs
3 teaspoons Vanilla
4 Tablespoons Butter, Melted
Extra Butter For Serving
Maple Or Pancake Syrup For Serving (optional)
 
Mix together flour, cornmeal, salt, baking powder, and sugar in a bowl. Set aside. In a separate bowl, mix milk, eggs, and vanilla. Pour into the dry ingredients, stirring gently.Stir in melted butter. Set batter aside. If batter is overly thick, splash in a small amount of milk.

Heat butter  (or use non-stick spray!) in a skillet over medium-low heat. When heated, drop 1/4 cup batter per pancake and cook until golden brown on both sides. Remove from skillet and set aside. Serve with additional butter (optional) and top with syrup of our choice!


If you end up with loads of extra pancakes here is my tip for you - freeze them in stacks of three or four pancakes for a quick breakfast later in the week. Just stack and either wrap in plastic wrap or place in a ziploc bag. Ready, set, eat breakfast!


Tuesday, October 16, 2012

Mean, Mean Garbage Disposal


This is what happens when you put one of your piping tips down the garbage disposal...


Sad, sad day. 

Wednesday, October 10, 2012

Skinny Spinach & Sausage Pasta Bake

This recipe appeared in my inbox a couple of weeks ago and when I saw it, I knew I had to make it. What's not to love - pasta, cheese (lots of it!), sausage and spinach! Even if you are not a spinach lover or think it would stop someone from eating this fabulous dish, trust me, although you see it in there, you really won't taste it. This is especially great for those kids that hate all green things and won't eat their veggies. This is loaded with spinach and a great way for anyone, not just kids, to get in some veggies. Plus, did I mention it tastes great?  This dish is super easy to throw together and you can even make it ahead of time and pop it in the oven when you are ready. It's great for those weekends where you want to make lots of things ahead so all you have to do is take it out and heat it up. Simple and yummy dinner ready to go. In fact, you can even prep it all and then freeze it. Why not? Just take it out and simply bake from freezer straight to the oven. Just keep in mind that it will take longer then the recommended time in the recipe below (at least double, if not more). Let me tell you how to throw this together.

First, you'll need to brown the sausage. You will want to find Italian chicken sausage. Sweet, mild or hot. Whatever you like. I used mild. Also, you do not want to use the pre-cooked kind either. You want raw sausage. Of course, if you are vegetarian, you can omit this part. Once you pick a sausage you like (if you can't find chicken, use a lean turkey), remove the casing and brown it up in the pan until fully cooked. Then remove from pan and drain on paper towels to remove the excess grease. You don't want that in your pasta or in your tummy.

Next comes the sauce. Cook up some garlic and onions, but make sure not to burn it. If you burn it, you'll have to start all over. That would be awful. And you'd have to use a new pan. Have you ever tried to cook something in the same pan you just burnt garlic in? That's a no-no. Just trust me. Once the onion and garlic have cooked for a bit, add in the spinach (make sure to drain and squeeze out all that extra liquid!), tomato sauce and the sausage. You can use your own tomato sauce here or your favorite store bought. I love Trader Joes Low-Fat Marinara in the big can. It's the best. No really it is. Well, at least I think so.

Last but not least, the layering. Once the noodles are cooked, layer half of them in a large baking dish. Then, cover the noodles with a layer of sauce and then of all of the ricotta, mozzarella and parmi mixture. Repeat with noodles and more sauce. Finally, top it off with the rest of the mozzarella and parmi and you are ready to go! Easy, delicious and no one will ever know it's "skinny". The captain didn't even know. Well, he did after I told him. He even went back for seconds. 

This dish is a real bang for your calorie buck - it's just about 400 calories for a 1 3/4 cup serving (so many noodles!) and it has over 25 grams of protein. Whoa! Totally filling and totally satisfying. Serve with a small side salad and you are good to go.

ingredients!

cheese please

I used mild chicken sausage from Whole Foods. It was SO good.

the sauce is coming together

I made this in two smaller dishes, but you can also do this in a large 9x13 size pan.

basil for decoration

dinner is served.
Skinny Spinach & Sausage Pasta Bake (slightly adapted from www.skinnytaste.com)

non-stick spray (such as PAM)
1/2 cup grated Pecorino Romano
8 oz fat-free ricotta
8 oz part-skim mozzarella, shredded
14 oz uncooked Italian chicken sausage, removed from casing
12 oz high-fiber or low carb rigatoni pasta
1 tsp olive oil
4 cloves smashed garlic, roughly chopped
10 oz package frozen chopped spinach, thawed and squeezed of excess liquid (I used a 12 oz bag here, but use what you have!)
salt and fresh pepper to taste
6 cups marinara (or your favorite jarred sauce)


Preheat the oven to 375°. Spray a 9- x13-inch baking dish with non-stick spray and bring a large pot of salted water to a boil.


In a medium bowl, combine the ricotta, 6 tablespoons of the Pecorino Romano cheese and half of the mozzarella cheese.


Meanwhile, in a large deep skillet, brown the sausage breaking up into small bits until cooked through; set aside. Add the oil to the skillet and sauté garlic about a minute, careful not to burn. Add spinach and season with a little salt and pepper and cook another minute. Return the sausage to the skillet and add the marinara sauce; cook on low about 2-3 minutes.

When the pasta water comes to a boil, cook pasta according to instructions for al dente, but undercook them by 4 minutes less. Drain and return to pot.

Put half of the cooked pasta into the prepared baking dish and top with half of the meat sauce. Spoon the ricotta mixture on top of the sauce in an even layer. Cover with the remaining pasta and the remaining sauce. Top with the remaining mozzarella and Pecorino Romano cheese. Cover with foil and bake for 20 minutes. Remove foil and bake for an additional 6-7 minutes or until the mozzarella is melted and the edges are lightly browned.


Don't forget to save a little marinara on the side to pour over the top of your pasta for a little extra sauciness!


Tuesday, October 9, 2012

Corazón de Pollo

I did something last week that I never, NEVER thought I would ever do in my whole life. I ate a chicken heart! 

I don't know what came over me or why I even decided to do it, but you have to live life on the edge once in awhile, right? My totally amazing friend and co-worker Nancy (I like to call her mama Nancy), told me she was going to bring them in and of course I told her I would eat one.  What was I thinking, right? She said they were delicious and it really didn't sound all that bad. She was marinating the hearts in garlic and soy sauce and then breading them and lightly frying the little hearts. How bad could they be if they were fried? Everything is better fried. Well, most things.

Then came the next day - heart day. I ate one. Only one. I thought I could do two, but I just couldn't. The flavor was chickeny, but a deep, rich chickeny flavor. Think dark meat, but times a thousand. Really rich. That wasn't so bad. The part that really got me was that I was still eating a heart. A boom boom boom heart. It even looked like a heart. I wanted to cut it open, but was told not to. I chewed and chewed and chewed, and it took all my willpower to get it down. That and I kept thinking of the time my grandma cooked giblets in the microwave and she cooked them so long they exploded all over. Way to traumatize a fourth grader, grandma!

I don't know if I will ever eat a heart again (Nancy says they are better fresh, so maybe I will try then), but at least I can cross it off my bucket list now. In fact, I think I might become a vegetarian now. Maybe. Now comes the real question - have any of you eaten a chicken heart?


thump, thump, thump...HEARTS!


 Are you grossed out yet?

Saturday, October 6, 2012

Breakfast Burritos

Breakfast burritos are truly the perfect meal. Eggs, veggies, meat and cheese are all wrapped up in the perfect package and ready to take on the go (or eat at the table). No knife or fork needed. Just two hands and a hungry tummy.

Now, I've made breakfast burritos before, but I wanted to try something new. Something a little different.  You all know that I love the Pioneer Woman and a few weeks ago when her show came on Saturday morning, she featured these breakfast burritos for her hungry husband while he was working on the ranch. I thought to myself, boy these would be good to make to take to Reno for the captain and I this weekend. Reno you may ask? Every year, well for the past couple of years, the captain and I have been going to the Reno Air Races in September. He's been going since he was a little guy and has never missed a year! Impressive, right? Seriously. There are so many awesome planes to see and the racing is really cool. Just don't tell him that I think I am turning into a Strega fan. If you don't know what I am talking about, Google it. Just trust me.

Back to burritos. The reason I wanted to bring these for us is because 1. we have to get up at the crack of dawn on Sunday to get out to the Reno-Stead airport before it get's too busy and to see some of the first races and 2. because I wanted to surprise the captain with a breakfast that all we had to do it heat up and hit the road. No stopping!  These burritos are super easy to make and don't take much time at all to put together. In fact, you can even make these a day ahead, wrap them in foil and place in the fridge until you are ready to heat them up. If you are me and like a little, okay a lot, of sour cream in your burrito, just make sure not to put it there until you are ready to eat. Or just plop a little on it when you are done heating it up. No one likes heated up sour cream. At least I don't. It just sounds gross.

The original Pioneer Woman recipe called for breakfast sausage, but since I had just made oven bacon (check out the recipe here!) I knew we had to go the bacon route. If you are not a bacon lover, by all means, just use a a pound of your favorite breakfast sausage here. No biggie. Then comes the next part - potatoes. I had a few left over from earlier in the week (I will have to show you the BEST way to make baked potatoes without using the oven!), so I went ahead and sliced them up and tossed them in the pan. If you don't have any left over, just pop a few in the oven or just slice a few raw ones up and cook them in the pan until tender. No need to get fancy here. Whatever is easier for you. Once the potatoes are ready, saute up some veggies - I used bell pepper, a little onion, green onion and there was even some left over cooked mushrooms in the fridge so I thew those in there too. Why not! Add in the eggs and bacon, cook until done and then you are ready to make your burritos. That is if you can avoid eating the egg mixture before it hits the tortillas. Don't say I didn't warn you.

I found these big tortillas for under 150 each! Be careful though, some are over 300!

cook up the potatoes

add in the bacon

eggs and green onions

close up of the egg action

burrito making station.

first, heat up the tortilla for a few second and then top with cheese

add the eggs and then top with salsa and/or sour cream

tuck and roll

ta da!

Breakfast Burritos (adapted from Pioneer Woman)
  • 1 package bacon
  • Two large potatoes (any kind), sliced
  • 10-12 whole Eggs
  • Chopped Chives, to to taste
  • 1 red bell pepper, chopped
  • 1/2 medium, chopped
  • 1/2 cup mushrooms (optional)
  • Seasoned Salt And Pepper, to taste
  • 1 cup Cheddar cheese (or any kind you like) + more for burritos
  • Flour Tortillas
  • Salsa, sour cream and other burrito toppings
Cook up the chopped potatoes until warm and brown (if they are raw, chop and cook in pan with a little olive oil until soft and tender). Then cook up a package of your favorite bacon. Drain off the fat.  Then cook up the veggies until soft and tender.

In a bowl, whisk together a dozen eggs (adjust according to your needs), chopped chives, seasoned salt, black pepper and about 1 cup of cheese. If you are feeling spicy, here is where you can add in some Tabasco or your favorite hot sauce.

Once your bacon is cooked and crispy, drain add in the breakfast potatoes and veggies back in and stir to combine over low heat. Pour the egg/cheese mixture over the veggie/bacon/potato mixture. You don’t want to stir too much or the potatoes will fall apart and become mushy. Cook over low heat and turn them occasionally to cook. 

When fully cooked throw some into a nice warm tortilla, slather on salsa (or sour cream or your other favorite burrito toppings) wrap it up and, if they need to be kept warm for a bit, wrap them individually in sheets of foil.


This recipe makes a lot of burritos, so you can cut the recipe in half or just make them all and freeze the extras for a quick breakfast when you need one. Just make sure to wrap the burritos up really good with plastic wrap or foil and then place in a big Ziploc to avoid freezer burn!

Wednesday, October 3, 2012

The Best Way to Cook Bacon!

Bet you didn't know there was a best way to cook bacon, now did ya? Let me guess - you usually pull out a pan and cook bacon on the stove top, right? It's okay, that's a good way of doing it, but there is just a better way - the oven!

I don't know why bacon gets such a bad wrap, because in all honesty, it's not as bad for you as you think. A couple of slices is about 100 calories and that is way less than any sausage you may have with your breakfast. Maybe I am just biased because I am a bacon girl when it comes to breakfast, but to each their own.  Bacon makes everything better, right? Plus, bacon is everywhere these days - not only in savory applications, but sweet as well. There is just something about that salty meat that has everyone hooked! Next time you try to make bacon, whether it's for breakfast or for dinner (mmm, BLTs!) try it in the oven. Just promise me you'll try it once. If you don't like it, you can go back to the stove top way, but you won't want to. In the oven, you simply lay the slices on a foil lined pan, put it in the oven and forget about it. No turning it over a million times and no grease popping on you. That hurts. Especially when it gets in your eye. Just saying. 

Once the bacon is brown and just perfect, remove it from the oven and place the slices on a paper towel to absorb the left over grease. Once it's cooled and crispy, you can use it any way you like! Even better, clean up is a breeze. Just let the grease cool a bit and then throw the foil away. No needing to find a can to put it in and no worrying about what will happen if you pour it down the drain. I know someone out there has done that - don't ever pour grease down your sink. You will be sorry and will probably have to call a plumber. That makes for a bad day.


line the baking sheet and put bacon in an even layer

crispy bacon!

just ball up the foil and grease and no clean up!

drain bacon and enjoy!

Oven Bacon
Preheat oven to 400 degrees F.

Lay the bacon a baking sheet lined with foil, make sure to lay them in a single layer (not overlapping). Bake for 15 to 20 minutes until the bacon is really crispy. Dry on paper towels and serve.


Mmm, bacon, bacon, bacon! Remember that commercial? Beggin' strips! Don't ask me why that just came to mind.


Tuesday, October 2, 2012

Weight Watcher Taco Soup

It has been 100 degrees the past week and soup is definitely not the first thing that comes to mind to cool me down. But, there is just something about this soup that I couldn't turn down. It takes less than 10 minutes to throw together and once it's in the crock pot, you just walk away and in eight hours you have a super yummy soup. Well, it's more like a stoup. Stoup = stew + soup. Maybe it's more like a taco chili. Regardless, you must try this and you won't believe how good it tastes for how easy it was. Promise!

First of all, don't let the Weight Watcher's part scare you. This doesn't mean the soup is flavorless or gross. In fact, it's the complete opposite. I don't know how many of your out there have done Weight Watchers (but I am sure you at least know one person that has), but it's a great program. I won't go into my whole commercial, but it's really great. I was quite heavy back during my younger years right before college and with a little push from my doctor and family, I decided to join. Let me tell you, it was the best thing I ever did. Seriously. It was a long and hard year, but I lost over 100 pounds! Oftentimes people don't believe me when I tell them that, but it's true. I'll show you the pictures! Well, not really. Just trust me, okay? I just wish they had this soup recipe when I was doing it. I lived off of their veggie soup and to this day, I still love it. So, I knew this one had to be just as good.

This soup consists of just a few ingredients and it can feed a family of four for under $15. Maybe even less depending on the store you shop at. All you need is a pound of lean ground beef (or ground turkey breast), a few cans of beans, corn and tomatoes, onion, garlic (the original recipe does not call for it, but I put garlic in everything) and a packet of taco seasoning and a packet of Hidden Valley Ranch mix. The latter sounded really strange, and to be honest, kinda gross (who puts ranch in taco soup?!), but I went with it anyways. If you are worried about salt content with the canned foods and packets, try to get low sodium beans, corn and taco seasoning. That's what I did. Unfortunately, the ranch packet doesn't come in a low-sodium option. Darn. From there, chop the onion and garlic, brown the beef and then dump everything from the cans (juice and all - don't rinse!) and seasoning packets into the crock pot. Give it a good stir, pop on the lid and then set it on low for at least eight hours. That's it. SUPER EASY. 

This soup on it's own is about 250 calories (or 6 WW+ points) for one cup. One cup may not seem like a lot, but trust me, it's really filling with all the meat and beans. And that ranch packet I was all worried about was not gross after all. You could taste a bit of a tang on the back of your tongue, but it wasn't like taco soup with ranch on it. Was I the only one worried that it would be? Probably. Top it with some low-fat cheese, light sour cream, and a little avocado and you are good to go. Don't forget to add a few homemade baked tortilla chips too - here is how you make them! Just a warning - those add more calories though - so if you are watching them, look for high fiber tortillas. My favorite ones come from La Tortilla Factory - Whole Grain Fiber & Flax. Just 90 calories for two! Best tortilla bang for your buck if you ask me.

ingredients + browning meat
everything in the pot but the meat

give it a stir

these are the best corn tortillas!

only 90 calories for 16 chips. winning!

dinner is served!


Weight Watcher Taco Soup 

1 lb lean ground beef (the leaner the better)
1 large onion, chopped
3 cloves garlic, chopped
1 (1 1/4 ounce) package hidden valley ranch dressing mix
1 (1 1/4 ounce) package taco seasoning mix
1 (15 ounce) can pinto beans (you can use black if you want here too)
1 (15 ounce) can chili beans (I used S&W brand)
1 (15 ounce) can whole kernel corn
2 (15 ounce) cans stewed tomatoes (Mexican flavor, if you can find it)
Brown the meat and then drain excess fat on a paper towel. Without draining, add all canned ingredients into a crock pot and then add in the onion, garlic, seasonings and cooked meat. Give mixture a stir and then turn on low for at least eight hours.

If you don't have a crock pot, you can also do this on the stove. Just put everything in a big pot, cover slightly and simmer for at least an hour. Bonus - for an added kick, add a can of diced green chilies. OLE!