Tuesday, April 23, 2013

Homemade Whole Wheat Cheez-Its

I've had my eye on a recipe for homemade cheez-its for awhile now. Like a long long while and what better time to try them out then for the captain and I's road trip down to San Luis Obispo. I know I've told you all this before, but anytime we go on a trip, whether it's just a few hours or a full day adventure, I always pack us snacks. And by pack, I mean make us snacks. I usually stay up too late the night or two before hand prepping everything and getting it ready, but it's totally worth it. Plus, it gives me an excuse to try out some new recipes! Now, I usually go with something sweet like a cookie (the captain and I are cookie monsters), but I wanted to change it up. Something savory and crunchy and these homemade cheez-it's hit that mark perfectly. No preservatives, all natural and just as addicting as the store bough ones. But better, way better.

I know what you are thinking - how the heck does one make a cheez-it? If you go and take a look at the list of ingredients on a box of cheez-its, there are a lot of ingredients. Don't worry, these don't have that many. In fact, you only need five ingredients. That's it! I bet you didn't think it would just be five, right? All you need to make these fabulous homemade crackers are cheddar cheese, butter, salt, ice water and flour. You can of course use regular flour, but to make myself feel a little better about eating these throughout our trip was to make them with whole wheat flour. Whole wheat means healthy, right? If you don't fancy whole wheat flour, go ahead and use the good 'ol regular all purpose flour. Also, if you don't want to use mild or sharp cheddar, you can use white cheddar. Ooh, white cheddar would be yummy in these. I will try that next time!

To make these cheez-it's, you will first blend the cheese and butter together until it's all mixed together. You can grate your own cheese, but since I didn't want to spend an hour grating cheese or loosing thumb skin (I know you know what I mean), I bought the pre-grated stuff. I know a lot of people are against the pre-grated stuff, but for this, I think it's just fine. Once the butter and cheese are mixed, add the flour of your choice and mix until all the flour is blended in and the mixture looks like little clumps. Then add the ice water until it all comes together. You want it moist, but not wet. Wet dough is sad dough. Once the dough is ready, separate the dough into two disks and let the dough chill in the fridge for about half an hour. Once 30 minutes has passed you are ready to roll out, cut and bake these little squares. Just don't forget to poke that signature cheez-it hole in the middle! When you are making these crackers, remember to roll out the dough thin - some of mine were a little too thick and took longer to bake. They were still tasty, but a little more on the chewy side than crunchy. Nevertheless, these cheez-its are a must make. Whether they are for a road trip, your family or just a snack for you, I promise you will love them!


I love recipes that are five ingredients or less!

butter and cheese. butter and cheese.

add in the flour

whip it. whip it good.

these look like hamburger patties.

I like to roll mine between two pieces of parchment paper lessen the flour-y mess

roll it as thin as you can. super thin.

cut into squares

place on parchment and don't forget to poke the hole!

brown, delicious and crunchy!

Homemade Whole Wheat Cheez-Its


8oz sharp cheddar cheese, shredded (you can use mild or white cheddar here too)
1 cup whole wheat flour (or all-purpose flour)
4 tablespoons unsalted butter, softened
1 teaspoon salt
3 - 4 tablespoons ice water (or more, if needed)
Preheat your oven to 375 degrees and line your baking sheets with parchment paper.

Mix together the shredded cheese,  half of the salt and the softened butter. Add in the flour and mix until the dough looks like little fluffy clumps. Then, with the mixer running begin adding the ice water and mix until a soft dough forms. Use as much ice water as you need for a dough to form. You want the dough moist, but not too wet.

When the dough comes together, divide the dough in two, form each into a disk and wrap in plastic wrap. Refrigerate the dough for about 30 minutes. Then, roll the dough out on a floured surface, or between two pieces of parchment paper into about an 1/8 inch thickness and using a fluted pastry cutter or knife, cut the dough into about 1 inch squares.

Transfer your little cheez-its onto the parchment paper, make a hole in the center of each with a toothpick, then sprinkle them with the rest of the salt. Bake for about 7 - 10 minutes (baking time will depend on your oven and thickness, so just watch them carefully so they don't burn! Mine were a little thick, so they took almost 20 minutes), or until they have puffed up and the edges begin to brown. Let cool before enjoying!


These cheez-its are best eaten right away, but you can store them in an airtight container. If they last that long.


Monday, April 22, 2013

Chocolate Chip Cookies For Two

Do you ever just wish for one warm, ooey gooey chocolate chip cookie, but don't want to make a whole batch? Well, if that is you then I have the perfect recipe for you! You don't even need a mixer - just a bowl and a strong arm. Or a Ryan. Ryan's are strong! This chocolate chip cookie recipe makes just two chocolate chip cookies. Wait, that's two huge chocolate chip cookies. Like big as your head chocolate chip cookies. Cookies that are perfect for dunking in milk or sandwiching ice cream. Or just eat them straight out of the oven. If you choose to do the latter, just don't burn your tongue.

These two cookies are the perfect chocolate chip cookies - slightly gooey and a little bit crunchy. You know, brown and crunchy around the edges and soft and gooey in the middle. Ya, I went there. This cookie recipe is perfect for when you get that chocolate chip cookie craving, but don't want to have an entire batch temping you on the counter. At least they tempt me. In fact, I'm pretty sure they whisper to me, "eat meeeeeee, eat meeeeee!". Some people say they can resist the extra cookies. If you are one of those people, I don't understand you. Or maybe it's the fact that I wish I had your willpower. Ya, that's probably it. How can you resist a chocolate chip cookie?


not pictured - butter

start creaming the butter and sugar

who needs a stand mixer when you have a Ryan!

Add the chocolate chips

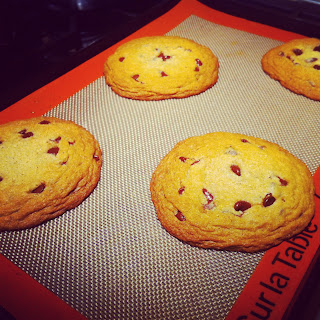
adding a few extra chocolate chips to the top makes the cookies better. ps. I doubled the recipe to make four cookies.

BIG cookies!

Chocolate Chip Cookies For Two (slightly adapted from Melissa at No. 2 Pencil)


Makes just two very large chocolate chip cookies!


2 tablespoons of butter
2 firmly packed tablespoons of dark brown sugar
1 tablespoon of granulated sugar
Pinch of kosher salt
¼ teaspoon of pure vanilla extract
1 egg yolk
¼ teaspoon of baking soda
¼ cup of all-purpose flour
3 heaping tablespoons of semisweet chocolate chips


Preheat oven to 350 degrees and line a baking sheet with parchment paper or a silpat mat.

In a microwave safe bowl, heat butter just until it starts to melt and is softened. Blend softened butter, sugars, salt, and vanilla together by hand. Add egg yolk and stir again. Add baking soda and flour and stir until combined. Then stir in chocolate chips.

Form cookie dough into two balls and place on baking sheet. The cookies will spread during baking, so make sure they are several inches apart. Bake for about 10 (mine took 16-18 minutes!) minutes, or until edges are golden brown. Enjoy!


Friday, April 12, 2013

Skinny Asian Turkey Meatballs With Lime Sesame Dipping Sauce

I am always trying to perfect the infamous meatball. This Sicilian girl may not make the perfect meatball just yet, but I promise you when I do, you will hear all about it. In the meantime, I must share with you a fabulous recipe for a twist on the traditional meatball - skinny Asian turkey meatballs. I know what you are thinking - skinny Asian turkey meatball, that sure does sound strange. I thought so too, but as strange as it sounds, it's that much better. Seriously. These are way beyond delicious.

These meatballs are loaded with tons of flavor. From garlic to green onions to ginger, soy sauce and sesame oil. If that doesn't have you hooked yet, let me continue. These meatballs are a snap to throw together and in less than 30 minutes, you will have a hot, delicious and healthy meal on the table your whole family will love. Even those that are meatball shy. Do those people even exist? These meatballs start off with ground turkey (if you use fat free ground turkey, these will come out too dry, so try to find the 93% ground turkey breast if you can!)
and you mix in egg, panko, green onions and so much more. My family does not prefer cilantro, so I swapped this for some fresh parsley. there is so much other flavor you won't even miss the cilantro. If you like it though, throw it in. If you don't, leave it out. My sister thinks it tastes like soap. Mix all the ingredients together and form 12 huge meatballs. I mean, big! I still can't believe three of these things are a serving, but they are. Once the meatballs are formed and ready to go (you can even make these ahead of time and pop them in when you are ready to eat) the meatballs in a super hot oven - 500 degrees - for about 15-17 minutes. Once they come out, you top them with a little bit of the dipping sauce which is made up of soy sauce, a little water, green onions, lime juice and sesame oil. How good does that sound? Delish! Three meatballs make up a serving with a tablespoon of dipping sauce for 230 calories. That's it! Serve with a half cup of brown rice and you are looking at under 350 calories for a meal that is healthy, fresh and loaded with protein. Doesn't get much easier or better than that. Don't wait to try these. In fact, try these for dinner tonight - you won't regret it!


so much flavor!

everybody into the pool

dipping sauce - it's a must!

best mixed with your hands. yes, it's gross, but just remember to not over mix it! no one likes tough meatballs.

cooked and ready to enjoy

served with brown rice and a side of broccolini and sugar peas!


Skinny Asian Turkey Meatballs (slightly adapted from Skinny Taste)


Meatballs
1/4 cup panko crumbs
1-1/4 lbs 93% lean ground turkey
1 egg
1 teaspoon ginger, minced
2 clove garlic, minced
1/2 tsp salt
1/4 cup chopped fresh parsley
3 scallions, chopped
1 tbsp low sodium soy sauce
2 tsp sesame oil


Dipping Sauce
4 tbsp low sodium soy sauce
2 tsp sesame oil
2 tbsp fresh lime juice
2 tbsp water
1 tbsp chopped fresh scallion


Preheat oven to 500°F.

Mix ground turkey, panko, egg, salt, scallions, ginger, garlic, fresh parsley, 1 tbsp soy sauce, and 2 tsp oil and mix with your hands until combined well. Shape 1/4 cup meat mixture into a ball and transfer to a baking dish. Repeat with remaining mixture. Bake until cooked through, about 15-17 minutes.

For the dipping sauce mix together lime juice, water, soy sauce, and remaining 2 teaspoons of oil in a bowl. Add scallions.

Transfer meatballs to a serving dish. Stir sauce, then drizzle meatballs with 1 tablespoon sauce. Serve meatballs with remaining sauce, about 1 tbsp per person. Chances are you won't use all the dipping sauce.

Makes 12 meatballs.


Who thought skinny meatballs would taste so good?!

Thursday, April 11, 2013

Strawberry Lemonade Cupcakes

I'm finally back. Hopefully you weren't too worried. Although, I bet you were just a little. No? Well, that's okay. I forgive you. I thought I had dodged all the germs and sicky ickies around the office, but boy was I wrong. What I thought was just allergies turned into the chills, a fever and the worst tonsillitis I've had since I was a little girl. Once that got better, it turned into an awful cold and then almost an ear infection. My ears hurt so bad I could have sworn it was one. The doctors at urgent care were probably tired of me coming in (I swear I see them more than my primary doctor), but thank goodness for them. They gave me the right mix of medicines to make me feel much better and luckily, I am back to normal. Let me just say, if you don't feel good and it's not getting better, go see the doctor before it's too late. Don't pull a me and think it will go away. Maybe it will. Maybe it won't. Never hurts to see the doctor to make sure. Better safe than sorry!

You didn't come here to talk about sickies now, did you? You came here for cupcakes! One of my dear colleagues, Charles, had decided to leave the company after over 12 years of dedication to the business. We all are going to miss him and what better way to send him off to his new adventures than with a big BBQ and homemade cupcakes. Not just any cupcakes though. Lemony fruity cupcakes. Charles loves lemon and I mean LOVES lemon. He won't eat chocolate treats, but boy will he eat something lemony. He's a strange one. Not really, but since he tried to run me down with his cart at Safeway years ago, I can say that. Nevertheless, I knew I had to make something extra special and step it up in the cupcake department for Charles. Especially since he's always telling me I need to go on Cupcake Wars. Maybe someday you'll see me on there. Just maybe. If I do, I maybe asking you to be my assistant. Charles already told me he won't do it because he'll eat everything I make. Oops.

I've done lemon cupcakes before, but I couldn't just do a regular 'ol lemon cupcake. I had to put a twist on it. Something with berries. Something berry lemony and berry good. What better cupcake to make for the lemon and fruity lover than strawberry lemonade cupcakes! I have been eyeing this recipe for awhile, but it's one of those things that needs to be made when it's warm outside and the sun is shining. That's not to say that you couldn't make this in a blizzard, but there is just something about strawberry lemonade that scream warmth. You know what I mean? These cupcakes do require fresh strawberries, so if they aren't in season, you may be out of luck. Although nowadays, you can typically find berries year round. The base of this delicious cupcake is dense, slightly sweet and speckled with lemon zest and fresh chopped strawberries.  Lots of chopped strawberries. The strawberry cream cheese frosting is light, not too sweet and loaded with fresh strawberry puree and lemon juice. It's the perfect combination of berry and lemon. Now, this cupcake would be perfect just like this, but because I wanted to step it up - so, I decided to fill this cupcake with lemon curd. Tangy, puckery lemon curd. To make homemade lemon curd, check out how I make it here. Although, if making curd is not your thing (it's not that scary, promise!), I must admit, Trader Joes sells a lemon curd that is pretty much out of this world and the price is pretty darn good too - only $2.99 for a decent size jar! I suggest picking up a jar or two and keeping them in your pantry for those late night lemon curd cravings. You know, for spreading it on english muffins or homemade waffles. I didn't tell you that though.

Now, let me just say, these cupcakes were a huge huge HUGE hit at the office. In fact, I couldn't believe how much of a hit they were. One person said these were my best cupcakes yet. Really? Whoa! One person changed their cupcake order due in a few weeks to include these instead of red velvet and they really love red velvet. One of the lawyers told me that I may need to re-think my future career path and open a bakery. He made me laugh. Charles, aka. Mr. Lemon, said these cupcakes would win me Cupcake Wars. No questions asked, hands down. Whoa. Guess that means they were pretty good and that you should probably get in your kitchen and make these. They are perfect for your next back yard BBQ, a going away party or just because. Let's be honest, you don't really need a reason to make these. Just promise me you will try them next time you get that lemon or berry craving. You won't be sorry. Well, maybe a little, because you probably will not just be able to stop at one. Don't say I didn't warn you.

I've gone berry crazy

add in the eggs one at a time

there is so substitute for lemon zest

adding in the milk.

I could eat this whole bowl

swirling berries!

in the oven they go

this frosting is loaded with butter and cream cheese. Paula Deen would be proud.

filled with lemon curd

beautiful light pink cream cheese frosting

frosted and topped with a fresh lemon slice!

Strawberry Lemonade Cupcakes (slightly adapted from Annie's Eats)

Makes about 20 cupcakes


For the cake:
2 1/4 cups all-purpose flour
1 1/2 tsp. baking powder
3/4 tsp. salt
2 tsp. lemon zest
12 tbsp. unsalted butter, at room temperature
1 1/2 cups sugar
2 eggs
3/4 cup whole milk
2 cups fresh strawberries, chopped


 For the frosting:
1 cup fresh strawberries, roughly chopped
12 oz. cream cheese, at room temperature
18 tbsp. unsalted butter, at room temperature
2 2/3 cups powdered sugar

4 tsp. lemon juice
1 tsp. vanilla extract


To make the cupcakes, preheat the oven to 325 degrees F.  

Line muffin pans with paper liners.  In a bowl, combine the flour, baking powder, salt and lemon zest. Stir together with a fork and set aside.  In the bowl of a stand mixer, beat the butter on medium speed until it is light and fluffy.  Add the sugar and beat until well combined.  Beat in the eggs one at a time, scraping down the bowl after each addition.  Add half of the flour mixture to the bowl and beat on low speed until just incorporated. Add in the milk and mix until smooth.  Add in the remaining flour mixture and mix on low speed until just blended.  Fold in the fresh strawberries with a spatula. Divide the batter evenly between the paper liners, filling them about 3/4 full.  Bake about 20 to 25 minutes or until a toothpick inserted in the center comes out clean.  Mine took just about 25 minutes, but your oven may vary. Allow to cool in the pan 5 minutes, then transfer to a wire rack to cool completely.

Once the cupcakes are cooled, if desired, fill the cupcakes with lemon curd. Core each cupcake with a teaspoon, corning tool or an apple corer to remove the center to hold about two teaspoons (or more) of curd. To make the lemon curd, follow the instructions here or use your favorite store bought curd.

To make the frosting, puree the strawberries in a food processor or blender.  Strain the puree through a mesh sieve to remove the seeds, and set aside.  Beat the cream cheese and butter in the bowl of an electric mixer on medium speed until smooth and very fluffy, about 5 minutes.  Add the powdered sugar and mix until smooth.  Add the lemon juice and vanilla extract and mix until incorporated.  Mix in strawberry puree, a tablespoon at a time, until you achieve your desired texture and flavor of frosting (I added about 5 tablespoons of puree).  If the frosting is too loose, feel free to add more powdered sugar until it reaches desired consistency.  Frost cupcakes as desired and garnish with fresh strawberries and/or lemon slices (make sure to pat the lemons dry with a paper towel!). Enjoy!


Pucker up!