Tuesday, October 25, 2011

Zucchini Chocolate Cupcakes with Sweet Potato Frosting - Recipe Fail!

A couple of weeks ago we harvested another LARGE zucchini and I thought that I would try to spice things up from my normal zucchini bread recipes and try a cupcake. Even better, a cupcake with sweet potato frosting. Sounds strangely delicious, right? I thought so too. Key word, thought.

I got super excited to make these for everyone at work and got to making these right away so they would be fresh to bring on Friday morning. I used my kitchen aid attachment to grate the huge zucchini and can you guess how many cups this big boy yielded?


Five cups! This guy is definitely not suitable for your every day cooking, but is great for baking. I followed the recipe perfectly, but when it came time to test them for doneness, they were still super moist and gooey. Strange. So, I put them back in the oven and checked them every three minutes until the tester came out clean. After the recommended 45 minutes of baking, they were still not done. After an hour, still not done. Something didn't seem right. I checked the recipe and ingredients again and didn't miss a thing. Figuring I did something wrong regardless of the recipe, I started all over again. Shoot, I had enough zucchini to try it. I double checked every ingredient and went super slow. As I put them in the oven I did a little cupcake prayer in hopes that the first round was baker error. 45 minutes later I went to check them and the same thing happened again. GOOEY AND NOT COOKED.

Let me tell you, I was super frustrated. I may have even cried a little bit inside, but I didn't tell you that. This was the first time in a long time that I have not had something turn out. Guess you can't win them all. As the captain stays, you win some, you lose some. I will be trying this again, but not anytime soon. Maybe you will have better luck with them? They sound so good, so I hope someone will have success with these.

ingredients.

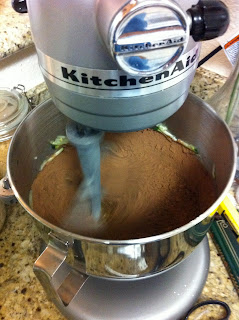
swirling cocoa powder.

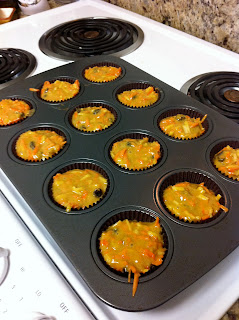
pre-baked. I was so mad when these didn't turn out, I gave up taking photos. Oops.

Zucchini Chocolate Cupcakes with Sweet Potato Frosting  (www.nearsightedowl.com)


1 1/2 cups all-purpose flour (spooned and leveled)
1 cup packed dark-brown sugar
2 teaspoons baking powder
1/2 teaspoon ground cinnamon
1/3 cup unsweetened cocoa
(use less/more for taste with even amount of milk)
1/3 cup milk
1/2 teaspoon salt
2 regular-sized zucchinis, coarsely grated (about two cups)
1/3 cup vegetable oil
2 large eggs, lightly beaten
1/2 teaspoon pure vanilla extract

Preheat oven to 350 degrees. Line cups of a standard (12-cup) muffin tin with paper or foil liners. Set aside. In a medium bowl, mix together flour, brown sugar, baking powder, cinnamon, cocoa, and salt. In another bowl, combine zucchini, oil, eggs, milk and vanilla; add to flour mixture, and mix just until combined (do not overmix). Divide batter evenly among cups. Bake until a toothpick inserted in the center of a cupcake comes out clean, 40 to 45 minutes. Cool in tin on a wire rack for 10 minutes; turn cupcakes out, right side up, and cool completely.


Meanwhile, make frosting.


1/2 pound cream cheese, softened

1 stick butter, softened
1/2 teaspoon vanilla extract
2 cups sifted confectioners' sugar
1 small sweet potato, cooked and scooped out of skin
Whole pecans for garnish

Microwave the sweet potato for a few minutes or until soft. Do this part ahead of time and cool in fridge or put in a bowl with ice to quickly cool down. In a large mixing bowl, beat the cream cheese, butter, sweet potato and vanilla together until smooth. Add the sugar and on low speed, beat until incorporated. Increase the speed to high and mix until very light and fluffy. Fill ziplock back with frosting, cut corner and use as a pastry bag to squeeze frosting on cool cupcakes. Top with one whole pecan per cupcake.

Maybe in a couple of months I will be willing to try this one again. In the meantime, I have been working on putting together a list of all the cupcakes I have made to date and the flavors of other ones I want to make. Boy has the list gotten long. Can't wait to share with you all my up's and down's of experimenting with cupcake flavors. Next up on the list - Guinness chocolate cupcake with a vanilla bean buttercream and crushed chocolate covered pretzels for decoration. Totally awesome right? If this one turns out, I might call it the Captains Cupcake. The captain loves Guinness and chocolate and this one sounds right up his alley.


Monday, October 24, 2011

Pumpkin-Nut Oat Bran Muffins

I am always looking for new things to make for breakfast - especially something quick and easy and something I can grab on the go as I am headed out the door to work. I love oatmeal and cereal during the week, but I also love a good muffin. Too bad all the ones I seem to like are loaded with sugar and a bazillon calories. This is why I usually say no to them (although the banana peanut butter ones Ryan makes are SO good and I can not resist. They aren't that bad for me, right?!). The other downside to muffins is that they never seem to keep me full for longer than an hour or two. I need fiber and protein. Wow, I sound like a 80 year old woman. Nevertheless, my friend Lauren (hi Lauren!), told me about this totally awesome muffin recipe with oat bran and a few other ingredients.

I browsed my pantry and really didn't have any of the ingredients, but I am sure glad that I went out and hunted them down. Most stores these days carry oat bran and agave nectar (Lauren said she found oat bran at Trader Joes), but I found mine at one of the local health food stores. I bet it would have been a lot cheaper if I would have gone to Trader Joes. Mental note for next time.  These muffins are super easy and you don't even need a mixer to make them. I used a bowl and a wooden spoon. I love my Kitchen Aid like no other, but I love recipes that can be done with a bowl and a spoon. Easy peasy.

Lauren made a couple of different versions - banana and applesauce if my memory serves me right. Those sounded awesome, but since I am on such a huge pumpkin kick these days, I thought I would make pumpkin ones. Yum, right?  They were totally delicious and totally filling. Not to mention totally low in calories. These bad boys kept me full all through my busy morning at work and I really wasn't hungry until lunch time. SCORE!  Just note, that when you are making these, the batter will seem super thick and slightly dry. You are doing it right, that's just how it is. That and they don't really rise much in the oven, so don't be surprised by that either. They are dense and scrumptious. If you are looking for a new breakfast item that fills you up and keeps you going strong, this is it!

just a few ingredients

wet & dry

all mixed together

baked and ready to eat. not sure why this only made 11.

Pumpkin- Nut Oat Bran Muffins (sightly adapted from twopeasandtheirpod.com)

 2-1/4 cups oat bran
1 tablespoon baking powder
1/4 cup brown sugar
1 1/2 cups canned pumpkin (not pumpkin pie filling)
2 egg whites
2 tablespoons agave nectar  (or honey)
1/4 cup pecans, chopped (or whatever nut you like)

Preheat oven to 425 degrees F. Line a standard muffin tin with paper cups.

In a large bowl, whisk together the oat bran, baking powder and brown sugar. In a separate medium bowl, mix together the mashed bananas, egg whites and agave nectar.  Add the wet ingredients into the dry ingredients and whisk until combined. Fold in the nuts. Divide the batter evenly between the 12 muffin cups. Bake until the muffins are lightly browned and a knife inserted in the center comes out clean, about 12 to 15 minutes. Cool the muffins in the pan for 5 minutes, then remove to a wire rack to cool completely. Store in an airtight container at room temperature.

See, how easy was that? These awesome muffins ring in at about 110 calories a piece. Great calorie deal for such a filling little thing. If you like, you can even heat these up in the microwave and top them with your favorite jam (or butter). Oooh, honey would be good too. These are great just how they are, and I love them. I think I am going to try Lauren's applesauce version with chopped apples in them. I am already salivating.
 

Wednesday, October 19, 2011

Banana Cupcakes with Honey & Cinnamon Frosting

I am always looking for new ways to use up ripening bananas. I do love me some banana bread, but it does get old after awhile - even when trying new twists on it.  On my fall cooking to-do list I have a banana cake that I want to try, but I thought it would be fun to do it in a cupcake version. I have been in this kick to try out a couple of new cupcake recipes a month (who wants to be my guinea pig?), and what better way to start then to try a classic flavor such as banana.

This cupcake was moist and dense and resembled the texture of banana bread. Of course you could eat these plain, but why eat them plain when you can have them with frosting! I thought a vanilla bean butter cream or a basic cream cheese frosting would be awesome on these, but it needed to be spiced up. Literally. Say hello to cinnamon and honey butter cream. It was the perfect match to the banana and was the best combination of sweet and spicy. It reminded me of honey butter, but better. I could probably smear this frosting on just about anything just like I could put honey butter on everything. But, don't worry. I don't. So simple, but so good.

hello spotty bananas

yum yum banana batter

ready to bake

frosted and dusted with chopped walnuts and cinnamon. oh, and a banana chip for extra love.


Banana Cupcakes with Honey & Cinnamon Frosting (slightly adapted from www.marthastewart.com)

1 1/2 cups all-purpose flour, (spooned and leveled)
3/4 cup sugar
1 teaspoon baking powder
1/2 teaspoon baking soda
1/4 teaspoon salt
1/2 cup (1 stick) unsalted butter, melted
1 1/2 cups mashed bananas (about 4 ripe bananas), 2 large eggs
1/2 teaspoon pure vanilla extract
Honey-Cinnamon Frosting (see below)
 
Preheat oven to 350 degrees. Line a standard 12-cup muffin pan with paper liners. In a medium bowl, whisk together flour, sugar, baking powder, baking soda, and salt. Mix together butter, mashed bananas, eggs, and vanilla. Stir to incorporate flour mixture (do not overmix). Dividing evenly, spoon or scoop batter into muffin cups. Bake until a toothpick inserted in center of a cupcake comes out clean, 25 to 30 minutes. Remove cupcakes from pan; cool completely on a wire rack. Spread tops with Honey & Cinnamon Frosting. Just before serving stop cupcakes with chopped walnuts, a dusting of cinnamon and a banana chip (optional)
 
Honey & Cinnamon Frosting

1 1/4 cup confectioners' sugar
1/2 cup (1 stick) unsalted butter, room temperature
2 tablespoon honey
1 teaspoon ground cinnamon
 
In a medium bow, using an electric mixer, beat confectioners' sugar, butter, honey and cinnamon until smooth - about 5 minutes.

These cupcakes were great, but I would love to try to make these lighter and fluffier. Here's to experimenting with leavening agents to make this winner even better! 
 
 Question - since this kind of resembles the banana cake, can I cross it off my baking to-do list? My gut says no. What do you think?


Tuesday, October 18, 2011

Homemade Hamburger Buns

While making the wonderful crockpot beer chicken, I thought it would be fun to attempt to make my own hamburger buns to serve this on. I've always wanted to explore making more yeasty breads and this was the perfect time to do it since dinner would be simmering away all day.  If I can do it, you can do it. Promise!

I used the dough hook on my Kitchen Aid to make this, but you can do this one by hand, stand mixer or even in a bread machine (do people still have these?). There is no need to make a starter with this recipe - you just mix everything together and kneed until the dough is smooth and soft. This took be about 5 minutes, give or take. Although, this was using a stand mixer on medium speed. I am sure if you are kneading the dough by hand, it might take a little bit longer. Once the dough is kneaded and soft, place in a slightly oiled bowl and let rise until doubled. The recipe said this would take about two hours, but mine seemed to take slightly more than that. About two and a half hours. Maybe my apartment wasn't warm enough, but don't be alarmed if it takes more than two hours or a little less to double in volume. If it does not start rising with in an hour, you may have killed the yeast and I would advise starting over. I am sure you won't kill the yeast here. This recipe is hard to mess up. Like I said, if I can do it, you can do it. You just need patience and time to let the bread rise.

you can use reg flour or bread flour for this one. since I had a TON of bread flour, I used that.

swirling bread

the bread rose - woo!

bread divided into eight equal rolls

rolls are puffy after rising for another hour

pre-baked - brushed with one egg white and 1/4 cup water whisked together. Top with your favorite toppings. I used poppy seeds on one half and sesame on the other. I bet onion flakes would be good on this too. Or plain.

baked, browned and beautiful.
Homemade Hamburger Buns (from www.kingarthur.com)
  
1 cup lukewarm water
2 tablespoons butter
1 large egg
3 1/2 cups all purpose flour (or bread flour)
1/4 cup sugar
1 1/4 teaspoons salt
1 tablespoon instant yeast

1. Mix and knead all of the dough ingredients — by hand, mixer, or bread machine — to make a soft, smooth dough. 

2. Cover the dough, and let it rise for 1 to 2 hours, or until it's nearly doubled in volume.

3.  Gently deflate the dough, and divide it into 8 pieces. Shape each piece into a round ball. Flatten to about 3" across. Place the buns on a lightly greased or parchment-lined baking sheet, cover, and let rise for about an hour, until noticeably puffy. 

4. Brush the buns with the egg white solution (one egg white whisked together until foamy with 1/4 cup water). Sprinkle on toppings.

5. Bake the buns in a preheated 375°F oven for 15 to 18 minutes, until golden brown.


These buns would be great for any sandwich or even with a big bowl of soup. They are light and fluffy and super easy to make. Just make sure that when you are buying yeast at the store to get instant yeast and not regular yeast. I had regular yeast in my freezer and almost made the mistake of using this. Good thing I didn't. These buns have inspired me to try more yeasty breads knowing that I could make these come out fabulous on the first try. Ps. These rolls freeze great! Just make sure to double wrap in plastic wrap and then place in a ziploc bag.


Crockpot Beer & BBQ Chicken

I usually just don't come out and say this so early on in a post, but I am just going to go ahead and say it now. This recipe is probably one of the best crockpot recipes I have tried in a loooooong time. Seriously, that many "o's".  The best part is that it is super easy and it comes out so flavorful and juicy. Also, this meal is one that is easy on the pocketbook and feeds a crowd at the same time. My tip of the day for you is to keep an eye out for chicken breasts when they come on sale (or get them at Costco!) and this will keep the cost down even more. Oh man, I am already drooling for another one of these bad boys covered in BBQ sauce. YUM!

All you need for this is a few spices, which I am sure you already have in your pantry, chicken breasts, beer, and BBQ sauce. That's it. Combine all of the spices (salt, pepper, onion powder, garlic powder, smoked paprika), sprinkle it all over the chicken breasts and the pour in the beer and BBQ sauce. Cook on low for about 6-8 hours (pending on how hot your crockpot gets or how big your chicken breasts are). Shread chicken and serve on your favorite bread or dinner roll. I decided to make my own and will be showing you how to do this soon!

How easy is that? Just keep in mind that this does make a lot of chicken and it is great for freezing for an easy dinner in a few weeks or a month from now. My advice would be to use this within three months to keep freshness and so that it doesn't lose its flavor or yumminess in the freezer. Wow, that was two tips in one post. You are lucky.

Get in your kitchen and start making this now. I promise, you will not be sorry you tried it.


mmm firestone. use a beer that you would drink when making this.

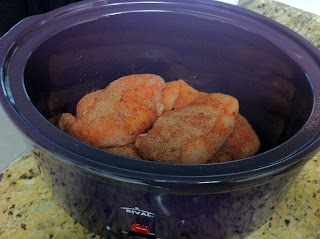
breasts rubbed with seasonings (don't giggle)

beer + bbq sauce

shredded chicken with some of the cooking sauce added in

look at that. are you drooling? I am.

Crockpot BBQ Beer Chicken (from www.howsweeteats.com)
 
3 pounds boneless, skinless chicken breasts (about 6 large)
1 tablespoon onion powder
1 tablespoon smoked paprika
1 teaspoon garlic powder
1/2 teaspoon salt
1/2 teaspoon pepper
12 ounces of beer
32 ounces of barbecue sauce

Season chicken with onion powder, garlic powder, paprika, salt and pepper. Add to crockpot, then add beer and 24 ounces of barbecue sauce. Cook on low for 8 hours, tossing once or twice if desired. After 8 hours, shred and add remaining barbecue sauce. Serve as desired.

 I used one of my favorite BBQ sauces from Trader Joes, but feel free to use what you like. Hot, spicy, homemade, sweet. It all will work. The extra sauce from this recipe makes a good topping to pour on the chicken or even better, whip up a batch of homemade coleslaw and use this on top of the chicken. I wish I would have done this when I made these (to make it more pork sandwich like), but it is just as good without. Next time I make these, and I will be, I will be adding coleslaw. It will be a match made in heaven.

Monday, October 17, 2011

Sangria!

The last time I made sangria I was in college. That seems like a long time ago. Not to mention, I'm pretty sure I probably used boxed wine to make it. I know, I know. I was in college and didn't know the difference between good wine and well, boxed wine. Since then, I have learned. Bad wine tastes like feet and good wine, is well, you just know when it's good.

Since I was making guacamole, I figured the perfect thing to wash it down was sangria. How good does that sound, right? Wine + lots of fruit + orange juice + deliciousness = fabulous. I think Ryan may have even said this one tastes like a boozy hawaiian punch. At least that's what I think he said. This one is super super easy to make and you can whip it up in no time. All you do is put the wine in a pitcher (or bowl) with the fruit and other ingredients and let the flavors meld overnight. The longer it sits, the better it gets. That and you can make a small batch or easily double or triple it if you are having a lot of guests. The next time you have something mexican for dinner and want to spice it up, make a batch of this. You will love it, promise! Just be careful when you bite into the chunks of fruit the next day - wowza are they boozy. Maybe you'll like them, but they were a little much for me. I'll just stick to drinking the sangria.

booze and fruit. yum. ps. got this wine with bevmo's 5 cent sale. If you have a bevmo around you, check it out. This sale is great to stock up on wine of all kinds at a killer price! ps. excuse the pants in the background of this pic. how embarrassing.

everyone soaking. I cubed the apple and sliced the oranges. Perhaps I should have taken a photo to show you all the sliced fruit. oops.

after one night of soaking. The sample was delicious!

Red Wine Sangria (a Bobby Flay Recipe)

1 bottle red wine (preferably a Spanish wine)
1/2 cup brandy
1/4 cup triple sec
1/2 cup orange juice
1/2 cup pomegranate juice
1/4 - 1/2 cup simple syrup, or more to taste (equal parts sugar and water, heated until sugar dissolves, cooled)
Orange slices
Apple slices

Mix all ingredients together and let stand in a tightly sealed container or pitcher for at least 24 hours in the refrigerator before serving. 


See, told you it was easy. I love easy recipes and this is one of them. You could even do this with white wine, if you are more of a white wine person (I love both - go figure). You could add peaches and peach schnapps with a splash of oj, or you could do apples and berries with a splash of chambord. Experiment with what fruit and flavors you like. You don't even need to add a liqueur. If you have it, try it - you don't need to go out and get it. Simple sliced fruit and wine will turn out a great cocktail!


Thursday, October 13, 2011

The Best Guacamole Ever

This is hands down the BEST GUACAMOLE EVER. Yes, it requires all caps and yes I am shouting this at the top of my lungs. My awesome friend and roomie from college, Leah (hiiiii Leah!), introduced me to this recipe. I can't remember which year she started making this (we lived together for three years), but I have never forgotten about it and make it all the time. Seriously, that good. It's so addictive you may just eat the whole bowl. Again, not kidding. Leah makes tons of good things (hello tamale pie and tempura veggies and shrimp!), but this one is one of my favorite things she makes. Now that I think about it, I bet this would have went well with our quesadillas with cheese rings and jalapenos! Aww, college memories. But I digress.

The best part of it all, is that this one is so simple and has a secret ingredient that will leave you thinking, "why did I not come up with this?!". All you will need is avocado, garlic, salt, pepper, lime juice and queso fresco. Have you figured out the secret ingredient yet? QUESO FRESCO! It's salty, creamy and crumby and its the best addition to guacamole. Most stores carry this next to all the other cheeses, so you should not have any issues finding this in your local supermarket. Leah mentioned to me recently that she also adds chopped tomato and red onion. I am not sure how I forgot she did that, but you can add it if you like it and leave it out if you don't. Next time I make this, I will be adding those two things. Love onion and tomato.

Beware, there is no real recipe for this one. If you have only a few avocados, mash them up and then add the rest of the ingredients to your taste and liking. Usually, I do five avocados, about three to four limes (juiced), four cloves garlic, chopped (give or take a clove), 3/4 of the queso fresco (crumbled) and then salt and pepper to taste. If you like more lime, add more lime. If you like more garlic, add more garlic (I usually do this and then it's a hair too garlicky for some people, but we all know how much I love to keep the vampires away). Mash and mix it all up and give it a taste test with some chips. Or your finger. I've been known to do that too.Make adjustments as needed for flavor and let it chill for at least 30 minutes before serving (this is my rule). It allows the flavors to meld and get all guacamole-y. Just remember, when you do this, make sure to put some plastic wrap on top of the guacamole (touching it), so that it limits the brownness from happening. This happens when air touches the avocados. It doesn't change the taste, it just looks unappetizing. If this happens, just mix it all up and no one will know. Maybe add a squeeze or two of lime juice too. This will freshen and brighten it up.

I am seriously drooling now. Leah, let's have a reunion and eat lots of guacamole and tamale pie (sans foil). Deal?

mmm, guacamole ingredients. I could probably eat the queso fresco by itself

mashing those avocados!

my avocados were a little stringy (for what reason I don't know), so I pureed them in the blender. Seemed to do the trick to smooth it all out.

See, told you I liked garlic


I was too excited with eating the guacamole, that I forgot to take a picture of the final product. Oops! I am not sure why my avocados were stringy, but usually I just mash them up and keep them in more of a chunky consistency. If you like it smooth, go ahead and puree it, but that is totally up to you. Regardless, you've got to make this and try it for yourself. I know I say this a lot, but once you try this you will become just as addicted to it as I am.

Here is a tip for ripening avocados fast. Take your avocados and place them in a brown paper bag with apples and/or bananas. Close the bag and place it in a dark area, such as a cupboard. Within a day or two, you avocados will be perfectly ready for scooping and guac making! Note - this make take a day or two longer (or it may go faster) pending on how hard or un-ripe your avocados are. With my experience, it's usually one to two days before they are good to use!

Wednesday, October 12, 2011

Lemon-Limoncello Cupcakes

The first time I ever made these, I tested them out on Ryan with out him knowing that I was getting his opinion on flavors that I would be making for his graduation party. Sneaky I know, but I am pretty sure he had no idea - at the time that is. They turned out great, but the first taste test came out with reviews of too tart and too much frosting. I am a frosting person and say, the more the better, but Ryan does not feel the same way. He believes there should be a proper cupcake to frosting ratio. Which I do agree, but I get carried away and get a little crazy with the frosting. I am working on it and someday, I'll get it down. Needless to say, the frosting ratio was fine considering how much lemon curd was filling the cupcakes, but the curd was too tart. Time for some minor adjustments.

The next time I made these was for Ryan's graduation party (woo masters degree - SO proud of you my dear!) and they were probably the most popular of all the cupcakes. I couldn't believe it. I like lemon, but never thought these would beat out the carrot cake or chocolate cupcakes. Boy was I wrong. This time around, I lessened the curd filling and went lighter on the frosting. It was the perfect ratio of sweetness to tartness. There is a little bit of cream cheese in the batter as well, so it gives the cupcake this dense moistness that just ties it all together. If you are a lemon lover, you've got to try these out. Just note that the curd does take some time to set up, so my advice would be to make the curd the day before you want to make these. If you made it a few hours before you wanted to use it, it will cool in time, but I just like to do it the day before so all the flavors can meld and so it's nice and chilled. I also feel it helps getting this out of the way so that there is less to do and you don't feel so overwhelmed when making these cupcakes. That's just my two cents though. You can find the curd recipe here.

limoncello - how can you go wrong?!

adding in the limoncello

cooling cupcakes

filled with lemon curd. I just used a teaspoon to help scoop out the center and fill.

iced, sprinkled and ready to eat!

boxed and ready for delivery. you can pick up these cute boxes at Michaels. If you have a Target in your area, keep an eye out for them in the dollar section, sometimes they are there too!

Lemon-Limoncello Cupcakes (from browneyedbaker.com)

Makes 12 cupcakes

For the cupcakes:
1½ cups all-purpose flour
1 teaspoon baking powder
½ teaspoon salt
2 ounces (½ stick) unsalted butter, at room temperature
2 ounces cream cheese, at room temperature
1 cup granulated sugar
3 large eggs
2 tablespoons limoncello
½ cup buttermilk
¼ cup lemon juice
Zest of one lemon

For the cream cheese limoncello frosting:
2 ounces (½ stick) unsalted butter, at room temperature
4 ounces cream cheese, at room temperature
1 tablespoon limoncello
2 cups powdered sugar, sifted

Preheat the oven to 350 degrees F. In a medium bowl, combine the flour, baking powder and salt; set aside. In the bowl of an electric mixer fitted with a paddle attachment, beat the butter, cream cheese and sugar on medium speed until light and creamy, 2-3 minutes. Add the eggs, one at a time, beating well after each addition. Add the limoncello and beat an additional minute. On low speed, add flour mixture and buttermilk alternatively, beginning and ending with the flour mixture. Add the lemon juice and zest and mix on low speed just until incorporated. Divide the batter between 12 muffin tins. Bake for 20 minutes or until a toothpick inserted near the middle comes out clean. Let cool completely.

Cream cheese limoncello frosting. In the bowl of an electric mixer fitted with the paddle attachment, beat the butter and cream cheese on medium speed until light and creamy, about 2-3 minutes. Add the limoncello and beat for an additional minute. Reduce the speed to low and gradually add the sifted powdered sugar and beat until fully incorporated and smooth.

Assemble the cupcakes. Cut a hole into each cupcake with the large end of a melon baller or the back end of a large pastry tip or teaspoon. Fill each cavity with the lemon curd. Pipe or spread frosting onto the cupcakes and decorate with lemon and sprinkles, if desired.

If you are having trouble locating limoncello, check your local bevmo. They will have it. Most grocery stores carry it as well, but bevmo will have it for sure. It is a little expensive ($25 or so), but it is well worth it. I think I may have even seen it at Costco, so check there too. Not only can you use in these cupcakes, but you can use it in so many other things - cocktails, cheesecake, and even cake! 


Tuesday, October 11, 2011

Lemon Curd - Lesson Two

As you know, I recently made lemon curd for a lemon layer cake that I felt was just too eggy for my taste. No one else seemed to notice this, but I sure did. Maybe it's because I am way too critical of the things I make, but I knew I had made a better one in the past. I attempted the lemon cake again last week for a co-workers birthday and let me tell you, it was SO much better with the new and updated lemon curd. It was the perfect balance between tangy and sweet and no eggy taste. Hallelujah!

If you are nervous about making your own curd, don't be. This one is just as easy as the last and it can be doubled, even tripled for any recipe you want to use it for. If you are going to try this one with the lemon layer cake, make sure you triple this one. Yes, it is a lot of lemon squeezing, but it's worth it. And no going to buy that bottled stuff. You'll need fresh lemon juice. It makes all the difference. Promise. Even better, this curd is used as a filling in one of my cupcakes - just wait until I give you that recipe!


just a few simple ingredients

lots of zest

sugar, lemon juice and zest simmering and eggs on the other side

tempering the eggs with the hot lemon solution

lemon curd ready to chill. make sure to cover with plastic so there is no skin!

Cake - Round Two

Tangy Lemon Curd (from browneyedbaker.com)

Zest of 2 lemons
½ cup lemon juice
¼ cup granulated sugar
1 egg + 1 egg yolk

In a heavy medium saucepan, stir together the lemon zest, juice and sugar and bring to a simmer over medium heat. In a small bowl, whisk together the egg and egg yolk. Whisk the lemon mixture into the eggs to temper them. Scrape the mixture back into the saucepan and place over medium heat, whisking constantly until it thickens, about 5 minutes. Remove from the heat, and let cool completely.

The lemon curd is great for cakes, cupcakes or whatever baking recipe calls for lemon curd. I've been reading on how to save this for later recipes and canning seems to be the way to go. Lemon curd on call anytime you want it? Heck yes! Have any of you ever canned curd before?

Carrot Cake Cupcakes

A couple of weeks ago (this tells you how far behind I have fallen on my blogging again), someone at work approached me about selling some of my cupcakes. They needed about 30 cupcakes for a family party they were planning and having tasted some of the ones I made before, they wanted to know if they could buy them from me. I couldn't believe it. Someone wanted to buy my cupcakes?

After doing some thinking and deciding on pricing (I ended up charging too little - I underestimated the price of pecans!), I decided to say "yes!". The order was in and there was to be 10 german chocolate, 10 carrot cake and 10 lemon limoncello cupcakes (recipe coming later!). I have featured the german chocolate ones before and if you are interested in making them, check them out here. So good. I wish I had one right now. 

leaning tower of cupcakes ready for delivery!

These carrot cake cupcakes are to die for good.  The first time I made these were for my Dad since this is one of his all time favorites. I also made these for Ryan's graduation party as well and everyone loved them. They are moist, slightly sweet and best of all they have raisins! There is something about having raisins in the cake that is a must. They get all plump and juicy when they cook in the oven and when you bite into the cupcake, they burst in your mouth. That and paired with the ultimate cream cheese frosting, it's heaven. I shouldn't admit this, but I would totally eat this frosting by the spoonful if I knew it wouldn't go straight to my booty. This is without a doubt the best carrot cake cupcake I have had or made and is now a recipe that will be part of my collection for a long time. I bet once you try these, you will feel the same way too. Oh and if you don't like raisins (who doesn't like raisins!?), you can leave them out. Same goes for the nuts. If you don't like walnuts, use pecans. Or visa versa. I must admit though, the nuts do give these an extra crunch next to the soft raisins. It's now time for you to get in that kitchen and try these. Seriously, run!


ready, set, bake!

look at the color on those carrots. ORANGE.

scooped and ready to bake

cooling cupcakes

frosted and ready to eat.

Carrot Cake Cupcakes (from joyofbaking.com)
2 cups all purpose flour
1 1/2 teaspoons baking soda
1/2 teaspoon salt
1 1/2 teaspoons ground cinnamon
4 large eggs
1 cup sugar
1 cup canola oil
2 cups finely grated raw carrots
1 cup grated apple (about 2 large)
1/2 cup  pecans or walnuts,  chopped
1 cup raisins 
  
Cream Cheese Frosting:
1/2 cup unsalted butter, room temperature
8 ounces cream cheese, room temperature
3 cups powdered sugar, sifted
1 teaspoon  vanilla extract 

Preheat oven to 350 degrees and place rack in center of oven. Place paper liners in 20 muffin cups. In a separate bowl whisk together the flour, baking soda, salt, and ground cinnamon. In another large bowl whisk the eggs, sugar, and oil until slightly thickened. Fold in the flour mixture until incorporated. Then, fold in the grated carrots, grated apple, chopped nuts, and raisins. Evenly divide the batter between the 20 muffin cups and bake about 20 minutes or until a toothpick inserted in the center of a cupcake comes out clean. Remove from the oven and let cool completely on a wire rack. Pipe or with a knife or small metal spatula spread the cream cheese frosting on top of each cupcake. Cover and refrigerate the cupcakes until serving time. 

Frosting: In the bowl of your electric, or with a hand mixer, beat the butter and cream cheese until very smooth and creamy. Gradually beat in the powdered sugar until fully incorporated and smooth. Beat in the vanilla extract. 

 How can you not like carrot cake? My mouth is seriously filling up with saliva as I type this. Seriously. Lots of saliva.